Showing posts with label tips. Show all posts

Sunday, September 23, 2012

Website Recommendation: One Pretty Thing

Have you checked out the amazing treasure trove of DIY that is One Pretty Thing?  Rachel collects on-line DIY tutorials like nobody else.  Her website is clean and easy to navigate.  She posts at least one roundup each day and it's easy to search for old roundups.  Here's what one looks like:

via

Keep in mind, this is just a screen shot!  This one Outdoor Roundup has two more rows of links!  It's DIY heaven!

Saturday, August 18, 2012

Coffee with Brown Sugar


Are you a coffee lover?  I sure am.  I like a little milk and sugar in my coffee.  I recently started using brown sugar instead of white.  It is so delicious!  Instead of adding pure sweetness to the coffee, it seems to enhance the flavor of the coffee.  The coffee is definitely sweetened but also somehow better.


I keep a small amount of brown sugar in a jelly jar and tighten the lid.  Brown sugar can very quickly turn into a big lump if it gets dried out.

I use the same amount of brown sugar as white sugar.  Try it and let me know if you like it!

Monday, July 16, 2012

How I made my favicon in under 5 minutes. (Ryan Gosling likes it.)


It was easy to make using picassa.

First thing I did was find a photo that had some white space.

I cropped a tiny portion of the photo (square) and added text.  It came out at 48 kb (under the 100 kb limit).

In my blogger design/layout, I clicked on favicon (upper left hand corner for me) and uploaded my little K.  Now, I'll have a little K when someone reads my blog in reader or opens it on their computer.

Wednesday, June 20, 2012

How to Upcycle Jewelry


I started making my own jewelry a little more than a year ago.  I didn't like what I was finding in the stores so I started looking at Goodwill and garage sales.  Again, I found a lot of things that were almost what I wanted.  Looking through my own small collection produced even more pieces of jewelry that just weren't quite right.

I figured that I could do a little learning and start making my own necklaces, earrings, and bracelets.  Sure enough!  With some research on YouTube, lots of trial-and-error, and the right tools (and lots of practice) I have been able to turn outdated and/or broken jewelry into wearable items!  I don't have a lot of before pictures but I have some things to give you an idea of what I'm talking about.

For example: This pile of parts was two different necklaces.


Too much wood all in one place!  And, shells?  I didn't want a necklace with FIVE of those gigantic shells!  However, two of them made killer earrings.  Do you see them hanging there in the back?  Two round white disks with leaves on them?  Those earrings sold before the craft fair even started!  :)  (Incidentally, the leaves came from another necklace.)


Some of the wood and the chain from one necklace went to these earrings (see below).  The pretty golden tags at the bottom came from the shells necklace.


These earrings used to be a hideous necklace!  The necklace was very short (I would classify it as almost a choker) and it was just these stone beads (dozens of them).  It was uncomfortable and ugly.  The earrings, on the other hand, are simple and beautiful!


This bracelet used to be a belt.  Totally ugly belt - really great bracelet!


The chains in this necklace used to be a bracelet.  Uncomfortable and gaudy bracelet - cool pendant!


The beads in this bracelet used to be part of a much bigger cuff (probably 100 of the same beads!).  It was also broken.  Those beads became earrings, bracelets, and necklaces.


This arm party (from left to right): thrifted watch, gaudy necklace turned into a bracelet, ball chain from the hardware store, thrifted belt turned bracelet (I would have never worn the belt but I wear the bracelet almost every day), and another thrifted belt turned into a bracelet.

I have posted about my upcycled jewelry before.  Click here to see more!

Why would you want to upcycle jewelry?


1)  It's economical.
2)  It's ecological.
3)  You get a piece of jewelry you really love and no one else owns!
4)  You can make multiple pieces of jewelry out of one original piece.  So, instead of having a bunch of beads left over (because you bought a whole string at the bead store), you start with just a few and mix them until you have a killer piece!
5)  It's fun!
6)  You learn some basic beading skills that will help you to fix any broken beaded jewelry you already own.

So, you are thinking that upcycling jewelry is a good idea?  Click "read more" to get all the details!

Thursday, September 15, 2011

Lamp Shade


Look what article went up on Re-Nest today!  I love to recycle and reduce whenever I can.  We have been using CFL bulbs in my house for years.  I live in an old house (built 1919) with some original light fixtures.  Sounds great, right?  CFL bulbs should not be fully enclosed by a light fixture AND they are longer than incandescent bulbs so they didn't fit in the old fixtures.  I had bare bulbs on my ceiling for longer than I'd like to admit.

Using steel wire from the hardware store, a wire nipper tool, a lamp shade, and some ingenuity I was able to cover my bare bulbs without fully enclosing them.  All you need to do is wrap some wire around the wire in the lamp shade so that it hangs from the light.  My fixtures (right by the ceiling) had holes for screws.  I just hung the wire through those holes.

Thursday, August 04, 2011

New Thumbnails


I just went through Kibbles 'N Knits on Etsy and redid my jewelry thumbnails.  I forgot that the thumbnail picture is absolutely key in getting anyone to look at your items.  That first photo needs to be compelling.  The center square of the photo is what shows up as the thumbnail.


The jewelry category on Etsy is absolutely saturated with items.  So many people make jewelry!  I hope my new thumbnails will help draw more views and purchases. 


I used picnik to edit my photos (crop, exposure) and create the before and after collage.  I've been really happy with picnik. It's free (with optional upgrade to premium) and it's very easy to use.  I think I'll keep on with it.

Sunday, July 31, 2011

Garage Sale

My neighbors and I are having a garage sale this weekend.  I set out the items I'm selling in my Etsy shop plus the usual garage sale fare.  We're doing the sale again today and I learned a few things about garage sales that I thought I'd share with you all.

1)  People will come early.  Try to be ready before you plan to open because otherwise it will be very hectic.  The morning was much busier than the afternoon.

2)  Kids don't think running a garage sale is as fun as shopping at them.  However, kids running a lemonade stand at the garage sale works pretty well.

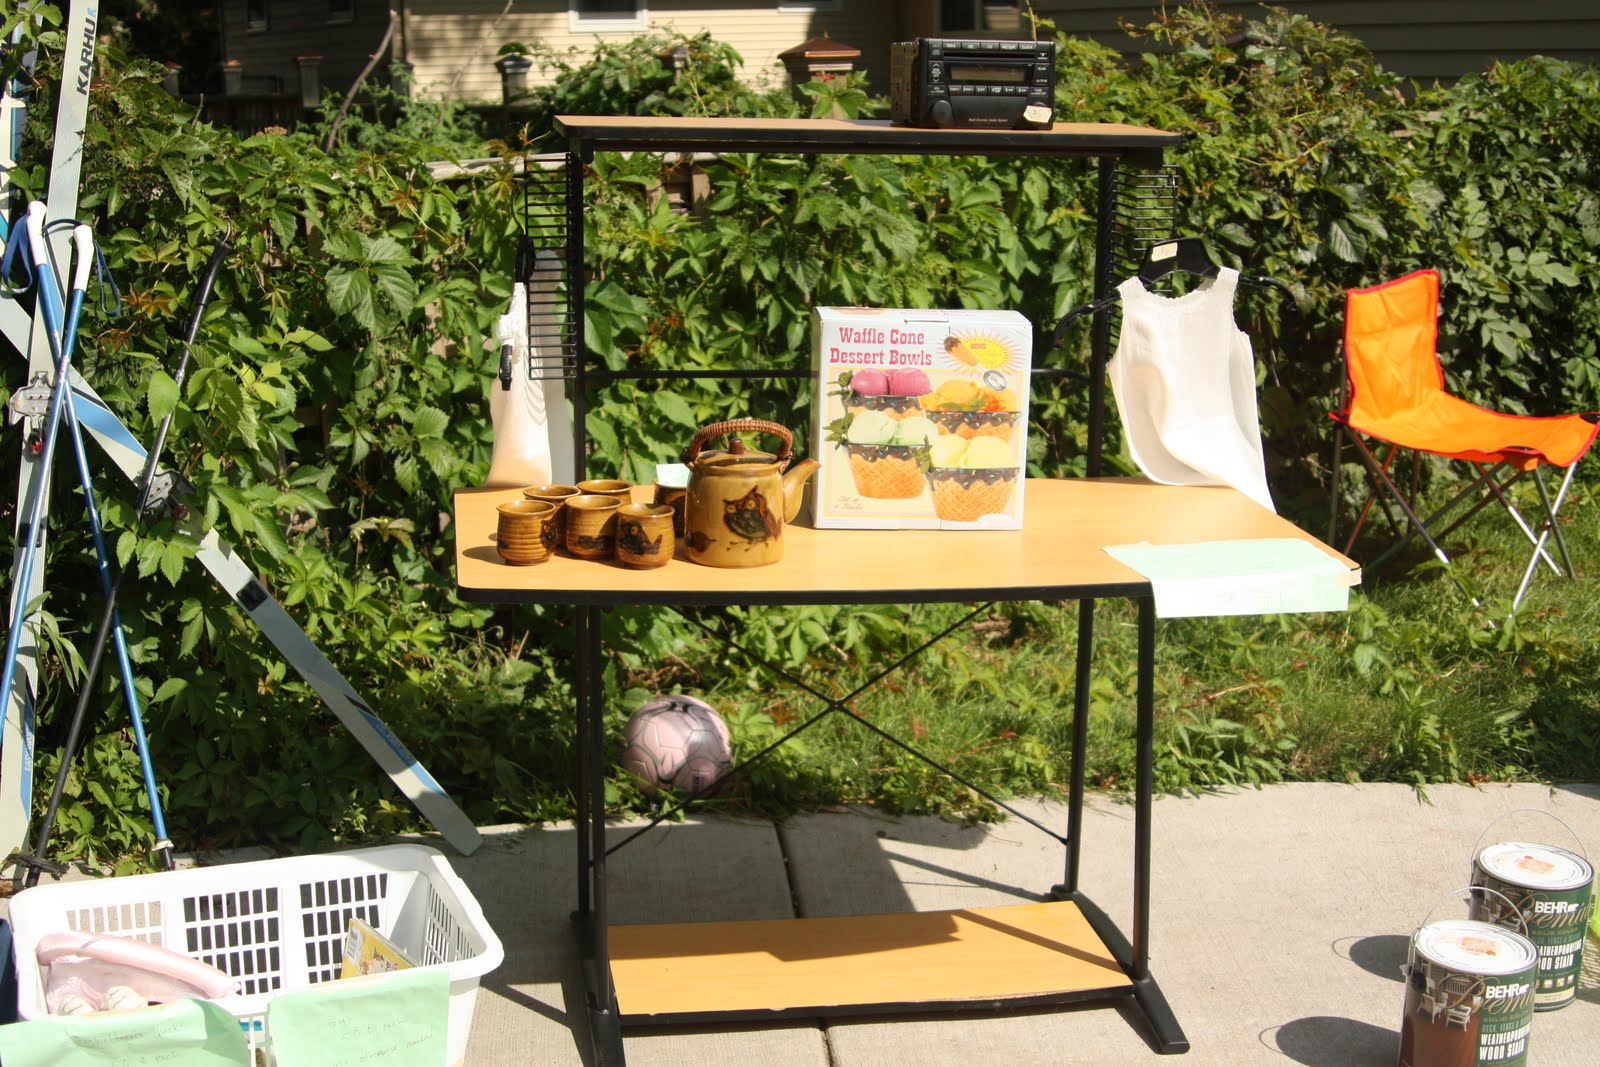
3)  Watch where people are walking - watch what they are buying.  I rearranged the items many times over the course of one day.  We made a lot more sales after rearranging according to traffic patterns, putting like items together, and bringing stuff outside.  For example:


These purses are a mixture of my vintage bags and some more contemporary bags from my neighbor.  I put my handmade jewelry next to the purses since they are basically a theme.

This table started out on the other side of the garage and hardly anyone even looked at it.  The purses were packed onto one side of the table with a box full of purses on the floor.  The jewelry was in the corner.

People walked up the driveway and around the corner into the garage.  The table with the purses and jewelry was out of their line of vision as they came in so they just skipped it.  We moved the purses to the opposite side of the garage, hung them from the garage door tracks, took them out of the box and set them out so you could see them better and "just like magic" the purses started selling.

Another thing that happened was I had some yarn in a bin.  No one bought the yarn.  I took the yarn out of the bin and the very next shopper bought all of it.


4)  If you are going to desks or tables at your garage sale, use them to display other items.  However, if you do use the furniture to display items, you should put a sign on it that clearly states the desk/table is for sale. 

5)  Kids' stuff: put the toys and books down where kids can look through it.  Don't overcrowd baskets, though.  If a bin is too crowded many people won't want to bother going through it.


6)  Bigger ticket (or just plain big) items may draw a lot of looks but they are harder to sell.  This china set is an example.  It's so pretty and it's vintage 1950s.  We only have it  priced at $30 (it's missing the tea cups) but that is expensive enough (and it's a huge amount of plates) for most people to admire it but not want to buy it.  Don't let it discourage you!  The right shopper may come along.

7)  Signs: make them simple and make them similar.  When I'm out driving and I see a sign that says "Sale" and has an arrow...I follow it.  Then, I see another of the same sign with an arrow...I follow it.  Don't fill your sign up with a bunch of extra information.  Drivers can't read all that writing anyway.  And, don't leave your shoppers stranded wondering where to turn next.  I had a guy tell me, "Don't need anything.  Don't want anything.  But, I saw your signs...."

8)  Talk to the people who come shopping but make sure you leave them to look around at your tables.  I love being welcomed to a garage sale with a friendly hello and a bit of small talk.

9)  If someone lingers over an item but doesn't pick it up right away, talk to them about it!  You might be able to negotiate a price or answer a question that was keeping them from scooping it up.

We're running our sale again today and I'm going to put my own tips to good use.  Happy garage-saling everyone!

Wednesday, July 27, 2011

Picnik

I just tried out a new free photo editing software program.  Picnik is a web based software program.  It was fast and easy to use.  I've been using picasa and it works just fine.  I tried paint.net a few years ago (liked it).  I would also like to try photoscape.  I don't do anything fancy with my photos.  I usually deal in brightness (fill light), contrast, and colors.  The important thing to me is that the software be easy to use.

Here's a picture you might recognize, but I did a little work on it in Picnik:


What do you use for your photo editing software?

Monday, July 25, 2011

DIY Guinea Pig Cage


We added two guinea pigs to our home this summer when we adopted two adult females who had been living together their whole lives.  I did a lot of research before we got our guinea pigs and I learned A LOT.  The main thing I learned is that guinea pigs need bigger cages than I thought. I'd seen them housed in tiny little cages so I thought I could just get a small cage from the pet store. I was wrong about that! Guinea pigs need a lot of room to run, and piggies who can get a lot of exercise are healthier guinea pigs (just  like people!).

Guinea Pig Cages is an excellent resource for caring for guinea pigs. I learned about building your own guinea pig cage from that site. I had a lot of materials on hand and ended up spending about $40 for this gigantic DIY guinea pig cage!  I still need to figure out a table to hold the cage off the floor (and reclaim all my bins and crates) but otherwise it's done and it works great!  Our pets have been living in their DIY cage for over a month.  UPDATE:  I salvaged a book shelf to use as the "table" under the coroplast.  I just set the bookshelf face down and plopped the guinea pig cage on top.  Looks great!  And, bonus, the bookshelf has open sides so I can store the bedding and food under the cage.


The cage is built with coroplast and storage cubes. I bought the coroplast locally but you can find it on-line. I already had the storage cubes in the basement.


I have two young kids in my house so I added plastic zip ties instead of just relying on the plastic caps that join the metal pieces. The cage is quite sturdy.


As I said, I have two young kids so I also built a lid for the cage. (A lid is not necessary if you don't have young children or other pets as guinea pigs cannot jump out.)  I bought small locks (meant for luggage) so that the kids couldn't get to the guinea pigs without an adult present.


Two locks linked together are also useful as a "hinge" between the lid and the non-moving cover.  This way we can just lift up the lid to feed, clean, and pick up our piggies.

The lid is four sides of the storage cubes held together with zip ties.  I laid two curtain rods across the cubes and zip tied them together.  The edges of the curtain rods extend past the perimeter of the cage so that the lid is held up by the curtain rods.


Can you see the guinea pig in her sleeping bag?  That's just a towel folded over and safety pinned at the edges.  They love cozy hiding places and the sleeping bags are a big hit!


May I also recommend this little rubber tote basket?  I found these at the dollar store and they are a great way for young kids to carry their guinea pigs from the cage to the couch/living room/play pen, etc.

I'd love to see pictures of your own DIY guinea pig cages!  (We call in the guinea pig mansion at our house.)  Post links in the comments on the blog.

Do you like DIY?  I have lots of DIY links for home, jewelry, kids, and fashion.

Monday, September 07, 2009

Hats That Fit


I'm making this hat for my son. I'm knitting it out of my own handspun yarn. It's turning out great! I wish I had captured a better picture of it, though.

Let me just put in a little plug for a pattern I go to time and time again. If you knit hats, this is a great basic pattern that will help you get a custom fit every time you knit. You can add your own cables or colorwork to any of her hats. The pattern is called:

Hats That Fit (and also check out More Hats That Fit).
Posted by Picasa

Sunday, August 09, 2009

Swingy Garter Yoke Cardi


It's done! It's done! It's done! (And it only took 3 1/2 months.)


I'm really happy with how it turned out. I had hoped it wouldn't gap at the front. And I was sad at first. But, it's growing on me. If at some point I don't want the gap anymore I can just sew some snaps to the button band and fix that right up!


I made these increases just under the yoke and added a few more at the underarm to give it a swingy A-line silhouette.


I sewed grosgrain ribbon to the wrong side of each button band. I'm so glad I did! I may go back to another older cardigan and add ribbon. It gives the sweater such a more finished look.

I also went for snaps instead of buttons after the grosgrain ribbon made buttoning my buttons too difficult. I like the snaps! I may just add ribbon to all my future cardigans.

I would definitely knit this sweater again. The original pattern is fitted and I might make one of those (you know, just knit the pattern instead of messing about with it). I think this pattern also would work with some stripes or lacy pattern at the bottom.


Here's my full list of modifications to the Garter Yoke Cardi by Melissa LaBarre:

1) Knit yoke with a needle 2 sizes smaller than necessary to obtain gauge.

2) Immediately after finishing yoke, on first round of stockinette, add increases. I increased using a 3 stitch repeat of: purl into the front and knit into the back of the same stitch, knit into the back and purl into the front of the next stitch, knit one stitch. If I were to do this again I would have knit 4 - 5 stitches next to the button band and then started increases and continued increasing all the way to the raglan increases.

3) After separating the sleeve stitches knit 1 inch at the underarm. Increase by knitting in the front and back of the same stitch 4 stitches from either side of the underarm marker (increasing 4 stitches each increase round). Knit about one inch and do the increase round again. Note: I only did this 2 times. I think I might have been able to get my cardigan to stay closed in the front had I done more increases on the “front side” of the underarms.

4) Don’t do the waist shaping.

5) Sew grosgrain ribbon to back sides of button bands. Sew snaps for closure.
Posted by Picasa

Sunday, July 26, 2009

Blocking Board


Here are my mittens blocking. They were pretty snug before I blocked them but now they are perfect.

Here's the thing - I block my knitting. I know some people don't but I always do. It's just really a hassle when you live in a very small house with no where to put a blocking board. Usually, the knitting would get moved to the bed when we were awake and to the dining room table when we were asleep. I couldn't really pin into my knitting because I would just have it on a towel. Not any more!


I was looking into buying Knitter's Block. This looks like a great product but I didn't want to spend close to $100 to get it. I wanted the ability to have small blocking boards as well as big ones. My sister solved the problem by suggesting I use something available at home improvement stores. I bought a sheet of foam board insulation from Menard's. It was 4 feet by 8 feet and 3/4 of an inch thick and cost $8.

It was too big to fit in my car so the nice gentleman in the warehouse cut it down for me. I have two boards big enough to block sweaters on and two thinner ones wide enough to block scarves, mittens, hats, etc.


Here's how it looked after I pinned into it. Obviously, it makes small holes. It's rather durable and I don't think the holes will be a problem.

When I was done blocking my mittens and my sweater I just packed up my boards and took them down to the basement. It's excellent!

Knitters have a huge number of very useful products available to us. I think we often only shop at yarn stores or craft stores when we're looking for knitting supplies. Consider what your local hardware store can do for you. I bought this blocking board and a new tiny hook for my broken drop spindle the other day. I saved a bunch of money by buying something that wasn't "cute" and wasn't being marketed to a specialized market.
Posted by Picasa

Thursday, July 16, 2009

My red sweater


My garter yoke cardi is coming along great! In fact, I have only to knit the ribbing on one sleeve and then I'm on to the finishing. I made some changes to the pattern such as these increases at the bust (I'll post a full list of mods when it's completed).


I got a great tip from and old episode of the Knitmore Girls podcast. Jasmin mentioned that she likes knitting her sleeves two-at-a-time. I was almost to the elbow on the first sleeve when I got started on the second. I'm so glad I did this!

- I could more accurately decide on the length of the sleeves since I had two arms with sleeves to look at in the mirror.

- I was much more motivated to knit (it's really hard to start that second sleeve).

- I could make adjustments to tension, guage, size as I went instead of realizing it at the very end of the project.

Clever thinking!
Posted by Picasa

Monday, July 13, 2009

TMI?


I'm going to share some personal information (perhaps a little too personal) but it's for a good cause! That is, if you think the earth is a good cause.

Some women get their periods like clock work. They know exactly when they are coming. Other women, such as the one writing this post, never know when the period is coming. It's usually somewhere between 15 and 45 days between periods. To avoid accidents, I wear a maxi pad just about every day. I really can't be teaching and suddenly think, "I have to get to a bathroom!" The honest truth is that I can't just go to the bathroom whenever I want to in order to check and see if my period has arrived. So, I have to have a little extra protection.

I was offended at the amount of pads I was using "just in case" my period showed up. I also seem to use a lot of pads at the end of period when I don't really need a pad but I don't want to stain my underwear. (I know - too much information.) So, I went out to Etsy and bought one or two pads from a variety of sellers. I found one I was very pleased with and went back for more. Pleat has a shop full of pads, and a line of happy customers.


These pictures are of the pantyliners. They are way more comfortable than disposable pads (I hardly notice I'm wearing them). One of the reasons I preferred Pleat's pads to the others I tried was that they were substantial enough for me to feel confident in them but still pliable enough to be very comfortable. They are very well made and they come in cute fabrics. The pads are made to order so you'll wait just a few days for them to arrive. The turn-around time is very reasonable. The seller must be sewing like crazy!

So far, I've only used cloth pads for the "just in case" time of my period and for the end of my period when the flow is really light. (Once my period starts I've been switching to disposables.) I just change the the cloth pads a couple times a day (for comfort and freshness) and they go in my regular laundry. I'm planning to switch to cloth pads for use when I'm at home but there are many women who use cloth pads all the time. I read that they are great for extra protection with a diva cup.

Pleat sells pantyliners, regular pads, overnight pads, and even thong pads! Instead of buying single pads you can also buy them in sets.

They are not hard to use or clean. Here's what Pleat's shop announcement says (and it's true!):

"New to cloth pads? Give them a chance and join the ranks of happy cloth users. They are super soft and comfortable - no more chafing from disposables. Secure, highly leak resistant, chlorine free, environmentally friendly and frugal, what's not to love about them? Oh, and I bet you would be surprised how easy it is to keep them stain free and fresh: just rinse in cold water after use, fold and snap, and then run through the washing machine at your leisure (before they dry out is best). A bit of white vinegar added to your wash load is an amazingly effective, inexpensive, all natural deodorizer that eradicates odors and mildew and leaves them fresh as new."

That's the end of my TMI post. I hope you will all consider cloth pads as another easy way to reduce waste.

Friday, July 03, 2009

Drying Kid Art


Do your kids like to paint? Mine sure do! But I didn't have anywhere to dry their art except the table or kitchen counters. That was really inconvenient. So, I strung some yarn across the towel holders above my sink. I just clip the art on when they need to dry.


And the yarn can be pushed back against the wall when there's no art drying on it.
Posted by Picasa

Tuesday, June 30, 2009

Mr. McGregor was right to be upset


Bunnies (or possibly squirrels) invaded my garden. I got some chicken wire from my sister-in-law but it wasn't enough for the entire perimeter of the garden. I'm going to get more today. But, while I waited for the chance to finish the fence, I tried out something I learned on the Gardenerd Tip of the Week Podcast.


She recommended putting bits of bar soap in drawstring bags around your garden. I don't know if this would work for in-ground gardens but it's been great for my container garden! Making the little bags was so easy. I sat outside sewing while my kids played in the pool. It took me all of 30 minutes to finish the sachets.

I cut two bars of Dial into 3 - 4 pieces each. Then, using small scraps of fabric, I sewed little pouches. To make the pouches I just basted around the edges sewing the soap right into the "bag". I scattered the soap around my garden two days ago. Even though I only have half a fence up, I haven't lost any plants since I soaped the garden!
Posted by Picasa